Home Decor through casting

Site for discussion of Interior decorating with Arkahdia Arts Studio casted pieces, statues, columns, pedestals, Angels, Buddhas, corbels, sconses, busts, plaques, animal figures, and other decorative pieces for the inside and outside.

Monday, November 21, 2005

How to quickly give a professional finish?(part 3 of 4) Highlight & shadow
-----------------------------------------------------------------------------
Time for my third installment in this 4 part series ...
This technique is exremely useful to give depth and reality to finished pieces which
the originals have either etched or raised surface features.

Highlight & shadow for stone, woodgrains, grasses, and mosses are just some of
the places you will use this faux finish technique. It will work marvels on pieces with etched or raised details like feather, rope bumped or faded rounded areas.

It's so easy I don't even want to give it away. Because it works on the same
concept of the real world and it's so simple.

In a real world environment, there is essentially a light source and it comes from a direction. So things which are down are such as creases, crevices in folds are in darkness. Meanwhile the high points like the side facing the light or the top of a woodgrain are light. All this technique does is highlight this fact and take it over the top.

Please note this technique must be done on a surface with 3d-detail only.

For this technique you will need 2 cans of spray paint, a dark one for the recesses and a lighter one for the peaks.

Unless your confining the techique to part of the piece you will not need to tape off any thing.
It is a simple 2 step process:

Step 1) Spray your item with your the darker paint from about 6 inches away, if your item has alot of crevices I would suggest turning it upside down for this coat so you do not miss undersides. Let it dry.


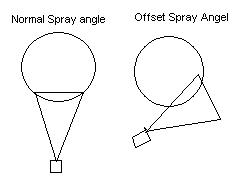
Step 2) This where you use the lighter paint to highlight. But the key here is not to directly straight onto the piece you want to spray an offset angle shooting out from the piece and rotate it. This will allow the crevices not to be hit with the lighter color. It's that simple. If you mess up just reapply the darker color let dry and do again.


Here is a sample of the effect on a mexican vase.


Sunday, November 13, 2005

How to quickly give a professional finish?
(part 2 of 4) 2-tone and MULTI-tone painting

-----------------------------------------------------------------------------
Time for our secret Number 2 how to do two or three tone paint jobs.
A godsend for those looking for a quick inexpensive in cost and labor decorating tip ...
Part 2) Two, THREE OR MORE tone paint JOBS....

There are a few simple tricks which doing of two or more tone paint application real simple.
Trick one - do lowest to highest relief
Trick two - cover large areas quickly
Trick three - ALWAYS ALLOW THROUGH DRYING!!!!!!
Trick four - touch up is easy

And you will be able to get extrodinary results in your home decorating with very little labor from these tips.

Both the three Chinese Dragon pedestal table bases and the Double Ki-rin dragon statue shown here in my office were done solely with this technique.
The total time spent taping was less than 2 hours and the spray time was less than 30 minutes.
The elapsed time for the project was 8 hours, because we were boxing orders at the same time!
You can't beat that

Step 1) Spray your item with your undercoat paint from about 6 inches away, if your item has alot of crevices I would suggest turning it upside down for this coat so you do not miss undersides. Let it dry.

Step 2) This is were the fact that plaster pieces are not smooth surfaced items and you will want to to paint different colors on raised areas. Pick the area that is lowest on your item and spray that color liberally on the item. Make sure to go further out then the edges you want to paint. You can be messy. Again
if your item has alot of crevices I would suggest turning it upside at times to make sure do not miss undersides. Let it dry thourghly (2 hours with krylon). If it is sticky let it dry more.

Step 3) Cover over the lowest areas which you just painted with blue masking tape. Note use wide making table with newspaper to cover over big areas and at the edges use thin masking tape with ripped pieces to cover up to the edges. Apply spray paint to the next lowest raised area. Again let throughly dry. (repeat this step for as many colors as you need)


These three Mexican Paeblo Relief Vases used this technique, for the whole vase combined with part 3's highlighting method.
Step 4) Now don't be scared remove the tape and newspaper. There will be areas where your tape job was not perfect. DON'T WORRY THIS IS A JOKE AND EVERYONE DEALS WITH IT!!!!! Simply take a little newspaper and spray the particular color on to it in a little pool. Grab your 35 cent brush and dip it in the paint and apply to touch up.

Optional Step 5) Spray a clear gloss, satin or matte sealer to give an even finish if needed.

YES IT'S STILL THAT SIMPLE!!!!!!

If you would like to get plaque or one of the thosands of other pieces for your decor please stop by and check out ArkahdiaArts.com

Sunday, November 06, 2005

How to quickly give a professional finish?
(part 1 of 4)

-----------------------------------------------------------------------------
We constantly do certain finished pieces for our customers here at Arkahdia Arts
and don't charge them an exorbidant fee because the methods we use are not
really labor or relatively money intensive. So we can charge less and
give it as a value add service. Note we sometimes use this technique to do
the bulk of our work on a project and then go in and do detail work.

The big secret?
SPRAY CAN'S AND MASKING TAPE and cheap $.35 brushes...

Here are 4 simple techniques and finishes one can do with them.
1) Antique Gold, Silver, Copper
2) Two, three, tone
3) Highlight & shadow for stone, woodgrains, grasses, and mosses
4) Weather affect

Please note I recommend that you do this outdoors and down wind from you!
If you are going to do this inside and/or going to do alot of pieces over and over
then please make sure to open the windows place a $15 fan pointing out to ventilate
the room.

In addition you can purchase a simple respirator mask with reuseable cartridges for about $20 from a company like Uline. I would recommend the "Reuseable Respirator 3M 6000" with Organic Vapor Cartridges. Don't bother buying the throw aways they don't ever seem to fit correct and they don't block vapors.

For someone with lung problems like me,
I can personally say that either down wind or a mask and fan works for me!

Alright time for the fun stuff! How do I go about doing this?
This is going to be so easy it's going to blow your mind!

Part 1) Antiqued Gold and Silver


We used this on 150 Breakable Buddha Statues for a Broadway production of Carousel starring Patrick Stewart at the American Airlines Theater.
Step 1) Spray your item with high gloss black (DO NOT FLAT BLACK you need the reflectivity) from about 6 inches away, (if you use krylon it will dry in 15-20 minutes in 60 degree weather) if your item has alot of crevices I would suggest turning it upside down for this coat so you do not miss undersides.

Step 2) If upside down flip your item right side up
Spray your item with a second coat of high gloss black you want to make sure you have full coverage, but be careful not to over spray otherwise you'll get drips. (let dry again) Note if you get drips just sand it off and respray


Step 3) This is where the magic begins! Get out your metal colored paint spray can (we used bright gold on the buddhas above). Now from 12 inches give a light dusting spray moving from one side to the other. That is it!!!!!

If you desire you can put a gloss sealer on, but it's not necessary.

Special Note! If you mess up and put to much on just spot light spray some black let dry and then spot light dust again.


YES IT'S THAT SIMPLE!!!!!!
If you would like to get one a buddha or one of the thosands of other pieces for your decor please stop by and check out ArkahdiaArts.com

If you like this home decorating tip drop me a line at Rich@ArkahdiaArts.com

Tuesday, November 01, 2005

Home Decor through casting

Will endevour to show you the quick and easy way to get professional results on a shoestring.

Providing Home Decorating Tips which are easy on the budget, your time and do not require alot of expertise

Welcome to
The Home Decor through casting forum.....


It is my desire to help you bring your vision to reality by helping you find and finish those casted items which will bring your home decorating ideas to life.

If it has to do with the use of a casted item, I hope to cover it in this arena over the next few months. Think of me as the Pied piper, Martha Stewart or Bob Villa when it comes to using
casted items. Of course with already having 5000 items available at ArkahdiaArts.com and constantly adding more, I have the background in Plastercraft, Cement and Resin, so this is not much of a stretch.

Some of the topics I will be covering will include faux finishing techniques, the differences and uses of products for dry and wet environments, how to support a table top with pedestals,
using corbels, sconces and medallions to highlight a room and add functionality with out taking up valuable floorspace. And of course I will be happy to answer your questions here.

Please feel free to send me questions, suggestions or shots of your projects which I will more than likely post rather quickly if they are appropriate. So Home, Office Decorating Tips will reign supreme here.